
Marble Restoration, Repairs, Cleaning & Polishing
Expert care for marble floors, benchtops, tabletops and fireplaces, so your investment looks its best for years.
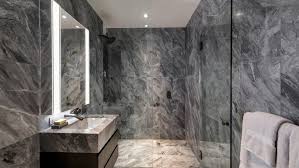
Timeless Stone That Deserves Expert Care
Marble is a highly popular stone for flooring, benchtops, countertops, tabletops and fireplaces. Known for its timeless quality and visual appeal, marble can be expensive, which is why it’s important that it’s well cared for.
Marble has very specific cleaning requirements and, even after sealing, can still be susceptible to staining. If your marble is damaged or stained, seek advice before cleaning it yourself, as abrasive cleaners easily scratch marble and the damage can be permanent.
From restoration and repair to polishing and sealing, our expertise helps keep your marble at its best and lasting as long as possible, from choosing the right stone to selecting the perfect finish.
Marble Services in Melbourne
Here’s a quick overview of our marble services.
Marble Restoration
Marble is wonderful for floors, countertops, showers and bathrooms, but over time it loses its charm and becomes dull and damaged. We use skilled, high-quality techniques to deliver flawless marble restoration across Melbourne and nearby areas.
Marble Repair
Marble tiles come in many designs and textures, but over time they can crack. Our experts repair your marble surfaces efficiently and affordably, using the right tools to bring back their original look.
Marble Cleaning
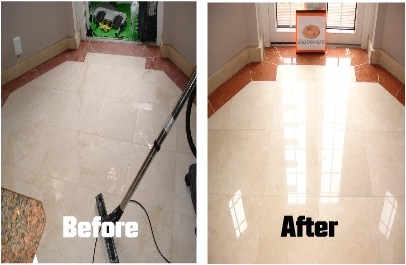
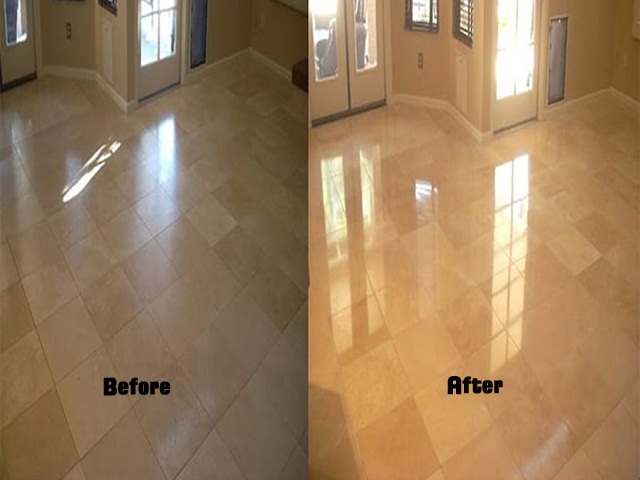
Marble floors look beautiful but attract stains and dirt. Our cleaning removes dirt, stains and debris to restore the original beauty of your marble, using chemical-free products that won’t cause further damage.
Marble Polishing
Marble looks its most attractive when polished. Our experienced team uses leading polishing techniques to bring back and maintain the shine of your marble surfaces.
Why Choose Shiny Stones for Your Marble in Melbourne
We’re passionate about exceptional service, from fireplace and benchtop restoration to polishing, cleaning, repairs, sealing and installation.
Expertise in Marble Services
Our highly trained team stays up to date with the latest marble care techniques, whether you need benchtop or fireplace restoration.
Quality Materials & Equipment
We use only the best materials, equipment and products, so your marble receives the care it deserves.
Customer Satisfaction
Our customers are our top priority. We work closely with you to understand your needs and make sure every project meets your expectations.
Competitive Pricing
Clear, straightforward pricing with no hidden charges, so top-quality marble care is easy to access.
Eco-Friendly Practices
We use eco-friendly products and practices. Our marble cleaner and polish are safe for your surfaces and the planet.
Professional Marble Contractor
We take pride in high-quality workmanship, completing every project on time and within budget, for residential and commercial properties.
Trust Shiny Stones for All Your Marble Needs
Your marble surfaces are an investment in both beauty and value. From marble cleaning and polishing to sealing and installation, we have all your marble needs covered.
Don’t let dull, damaged or dirty marble detract from the elegance of your space. Contact us today to schedule a consultation. We look forward to bringing your marble back to life!
Recent Projects
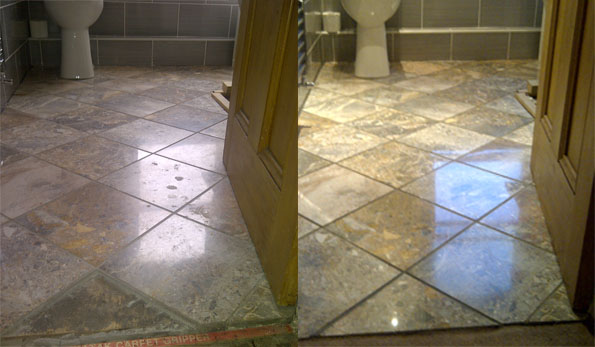
A few examples of our restoration work. Click any photo to view it full size.
Marble Care Questions Answered
1. How to Polish a Marble Floor without a Machine?
To polish a marble floor by hand, mix a few drops of gentle dish soap with warm water in a bucket. Dip a soft microfiber cloth or non-abrasive sponge into the soapy water and gently scrub the floor in circular motions.
Rinse the cloth frequently to avoid spreading dirt. After cleaning, use a clean, damp cloth to remove any soap residue. Dry the floor with a soft towel and then buff it with a dry microfiber cloth to restore shine.
2. How to Polish Marble Floors by Hand?
Polishing a marble floor by hand can be labour-intensive but is possible using a combination of baking soda and water. Mix 3 tablespoons of baking soda with 1 quart of water to create a thin paste.
Apply the paste to a small area of the floor and gently buff the surface using a soft cloth or sponge in circular motions. Wipe away the paste with a damp cloth, then dry and buff the area with a clean, dry cloth. Repeat this process for the entire floor.
3. How to Clean a White Marble Floor?
To clean a white marble floor, use a pH-neutral cleaner specifically designed for marble or a mild dish soap diluted in water. Sweep or vacuum the floor to remove dust and debris, then mop using a soft microfiber mop or cloth.
Frequently wash the mop or cloth to prevent the dispersal of grime. After mopping, dry the floor with a clean, soft towel to prevent water spots and streaks.
4. How to Remove Stains from Marble with Baking Soda?
Create a poultice by mixing baking soda with water until it forms a thick paste. Apply the paste directly onto the stain, covering it completely. Cover the poultice with plastic wrap and poke a few holes to allow moisture to evaporate.
Leave the poultice in place for 24-48 hours, then remove the plastic wrap and gently wipe away the poultice using a damp cloth. Wash the area with water and dry it with a cloth.
5. How to Clean Stained Marble?
To clean stained marble, first identify the type of stain (organic, oil-based, or rust) and use an appropriate poultice or cleaning solution. For organic stains, use a hydrogen peroxide-based poultice. For oil-based stains, use a poultice made from acetone or ammonia.
For rust stains, use a commercial rust remover specifically designed for marble. Follow the product’s instructions carefully, and always test a small, inconspicuous area before treating the entire surface.
6. How to Restore the Marble Table Top?
To restore a marble tabletop, clean the surface with a gentle marble cleaner and a soft cloth. Next, address any etching or scratches by lightly sanding the surface with fine-grit sandpaper, followed by wet sanding using water and 1000- to 2000-grit sandpaper.
Polish the surface using a marble polishing compound and a clean microfiber cloth in circular motions. Finally, seal the surface with a marble sealer to protect against future damage.
7. How to Fix a Cracked Marble Countertop?
Fixing a cracked marble countertop requires a marble repair kit, usually including epoxy resin, hardener, and colour pigments. Clean the crack and surrounding area, then mix the epoxy resin, hardener, and pigments according to the kit’s instructions.
Apply the mixture to the crack, filling it completely and slightly overfilling it to account for shrinkage. Allow the epoxy to cure, then sand the surface smoothly using fine-grit sandpaper. Finish by polishing and sealing the repaired area.
8. How to Seal Marble Countertops?
Clean and dry the countertop thoroughly. Follow the manufacturer’s instructions to apply a high-quality marble sealer using a clean, lint-free cloth or sponge. Allow the sealer to penetrate the surface for the recommended time, then wipe away any excess sealer with a clean cloth.
Buff the surface until it’s dry and shiny. Reapply sealer periodically as needed, based on the manufacturer’s recommendations.
9.How to Seal a Marble Shower?
Clean the marble shower thoroughly using a pH-neutral cleaner designed for marble. Allow the surface to dry completely. Apply a marble sealer specifically formulated for use in wet areas using a clean, lint-free cloth or sponge.
Follow the manufacturer’s instructions for application, penetration time, and buffing. Reapply the sealer periodically to maintain the protective barrier.
10. How to Install Marble Tile on a Concrete Floor?
First, ensure the concrete floor is level, clean, and debris-free. Apply a layer of waterproofing membrane or crack isolation membrane to the concrete floor, following the manufacturer’s instructions. Mix thin-set mortar according to the package directions and apply it to the floor using a notched trowel.
Press the marble tiles firmly into the mortar, using spacers to maintain consistent grout lines. Allow the mortar to cure, then remove the spacers and grout the tile joints. Finally, seal the marble tiles to protect against stains and damage.
11. How to Lay a Marble Tile Pattern?
Plan your desired pattern by laying out the marble tiles dry on the floor and adjusting them as necessary to achieve the desired look. Measure and mark the center of the room, then use chalk lines to create a grid corresponding to your tile pattern.
Start laying the tiles at the centre of the room, working outward in sections, following your planned pattern. Use thin-set mortar, a notched trowel to adhere the tiles to the floor, and spacers to maintain consistent grout lines. Once the tiles are set, and the mortar has cured, grout and seal the tiles as needed.
12. How to Restore Marble Floors?
Start by cleaning the marble floor with a pH-neutral cleaner designed for marble. Repair any chips or cracks using a marble repair kit. If the floor has significant scratches or etching, consider hiring a professional to resurface the floor using diamond abrasives.
Once the floor is clean and repaired, polish it using a marble polishing compound and a microfiber cloth, working in circular motions. Finish by sealing the floor with a marble sealer to protect against future damage.
13. How to Polish a Marble Floor at Home?
Sweep or vacuum the floor to remove dust and debris. Clean the floor using a marble cleaner and a soft cloth or mop. For minor scratches and dull spots, use a marble polishing compound and a microfiber cloth, buffing the surface in circular motions.
Consider hiring a professional to use specialised equipment for more thorough polishing of heavily worn or damaged floors.
Bring Your Marble Back to Life
Tell us about your marble surface and we’ll recommend the right treatment, with a free, no-obligation quote.